My POV Files
Tools Macros Construction Objects Textures
Here are some of the things I've done over the years.
I finally decide to take the time to put them on my web site.
As you will see my interest are varied.
I went through all my old POV files and rewrote
some of them to make them more user friendly.
NOTE: All these POV files have a built in display.
Most use the use the Get variable to let you turn off that display
and call it from another POV file. If Get is defined then the
display is turn OFF. If Get is not defined the the display is ON.
Which have this marvelous code?
Any thing with #ifdef(Get) in the file.
Have any Questions,Comments E-mail me at whetstoneleroy@gmail.com
Be sure to POV in the subject title or I might not read it.
Tools
these are my tools they make things that another POV files can use.
A complete system to make 3d Anagyphs |
RBamaglyph.zip |
|
| |
Animation fades |
LRfader.zip |
Animated Credits |
LRCredits.zip |
|
| Exploring Mars: needs mars image files
from http://planetpixelemporium.com/mars.html |
Explore_Mars.zip |
|
| Mesh2 trees and leafs with uv
mapping. Shape a tree to your liking. |
ReverseTree.zip |
|
Make Moon or Feild craters Image maps |
||
Rounded Prisms makes a Mesh2 file |
RoundPrism.zip |
|
Make Mesh2 Labels for Bottles |

|
Trapizoid macro |
Trapizods.pov |
| Strings |
||
| balloons |
balloon.inc |
|
| BEER cans |
Beer2.zip |
|
| Snowflakes |
Snowf.inc |
|
Rounded Cones |
RoundCones.pov |
|
Using an equation in a string to fill the Quadric function |
Quadric.pov |
|
Using an equation in a String to fill the Poly function |
Poly.pov |
|
9 Bit Manipulation Macros |
BitMac.inc |
|
Diner Plates and Bowls you choose the colors and age. |
Plate_BowlMac.pov |
|
Make your own M&Ms, P&Qs, D&Ds, what ever |
MMsmac.pov |
|
3 ashtrays you can change colors |
AshTrays.pov |
|
Cigars with Ash and Fire textures |
Cigars.pov |
|
Cigarettes with Fire and Ash textures |
Cigarette.pov |
|
| Almost Any
Pully you need use as macro or just change variables. |
Pullys.pov |
Working Dump Truck, Bed , Doors, Lights |
DumpTruck.pov |
|
Working Backhoe |
Backhoe.pov |
|
3 types of ladders |
Ladder.zip |
|
Stackable Scaffolding with planks |
Scaffolds.pov |
|
4 ft. Brick Layers level |
Level.pov |
|
Working Skill model with cord |
SkillSaw.zip |
|
| An Old hammer |
Hamer.pov |
|
| 6 string electic guitar |
Guitar.pov |
|
| make you own cheap chairs |
Chairs.pov |
|
| marble tables |
Tables.pov |
|
| Chess set with position macro |
Chesmen.zip |
|
| 28 peice set of dominos |
Dominos.zip |
|
| 3 diferent clocks 2 anilog one digital |
Clocks.zip |
|
| wooden tooth picks |
ToothPick.pov |
|
| wood floor toung and grove |
WoodFloor.pov |
| Put different star patterns on
any thing |
StarPigTex.pov |
|
| Displays most any cord you can think of |
KeyboardMAC.pov |
|
| US 1776 Flag makes image for image_map (uses the StarPigTex.pov) |
USflag76.pov |
|
| US 2006 Flag makes image for image_map (uses the StarPigTex.pov) |
USflag06.pov |
|

|
Roam around the
POV pattern universe eazily Choose your pattern, color_map, turbulence and location and warp to mirrow either left\right or up\down. |
UniversePat.pov |
All these programs are freeware!!
Things you should know Links Home
|
Color picker |
||||

|
Color map maker |
more info |
|||

|
Polygon an Prism editor |
more info |
|||

|
Sor and lathe editor |
more info |
|||

|
3d anaglph maker |
more info |
|||

|
wave Lip Sync |
more info |
|||
 |
What you see here is all you need |
A small program to put time and date on the clipboard. for use in the Tools menue |
more info |
||
|
|||||

|
|
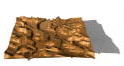
Mapper makes image maps using contour lines |
more info |
||

|
|
MapperFix
modifies image maps |
more info |
||

|
|
MapPlacer
place things on height feild |
more info |
||
All the programs where written for Win98 with a 24 bit screen display.
(I have Win XP now. I've had no problems with them)
You must have a mouse to run these programs!
They all come with help files.
Programs that can load and save files have there own
ini file to keep track of the directory used.
They where written in C++ with Freeware. see Links
I've only been able to test them on my computers.
I have a 1.79ghz Intel Pentium Dual core with .99 GB RAM.
I had a 1.2ghz AMD Athlon with 512 meg RAM.
Each program is in their own zip file. I used Win Zip to create them.
When unzipping them be sure to use the use folder names.
Each program is in a directory in its zip and some have subfolders.
| |
|
7-2006 |
|

Overview Robot
Instillation Head
Quick Start Hands
Files Poses
Pose programs Animation
Contact Me
Overview
When I first started making robots I made them by hand. I made every part, texture them, rotated them and place them.
When I animated my first robot I had to start from the ground up and rewrite everything. All the parts moved just using the
clock I didn't get very far with animators doing it that way. Then I found out about KeyFrame animation and reusable poses.
My first keyframe animated robot used 9 poses for a little walking. The robot itself was rather plain with clamp like hands.
The face expression and hand position was part of the pose data. So if I wanted a different expression on the face during
a walk I'd have to rewrite all 9 poses. That's when I came up with Quantum Robots.
Quantum Robots has evolved into a mutirobotic system. A robot is divided into 3 parts Head, Body,and Hands. Each has it's own pose files. You can make several different robots by changing these parts. (see more in Robot)
There are several files to
make a robot. The robot is made from 3 pov files 3
inc files and 4 txt files. The pov
files make the hands, head, and body. The inc files deals
with the textures, reading poses,and calculating the contact point. The
txt
files contain the poses of each robot part(hands,head,body).
If you want to animate a robot you'll have use 1 more pov
file, 1 more inc file, 4 more txt files.
The pov file displays the animated robot, the inc
file calculates the intermittiate angles between poses, the txt
files contains a list of keyframe poses
for each robot part(head, both hands,body)
So how many files do
we have so far... I count 16. That's
a lot of files to keep track of !
In order to keep track of them all I organized them into 9
folders. There are 3 folders for robot part poses, 3 folders for
Keyframe files, two for the robot files, one for animation robot file.
See Files for all the folder names.
Instillation
Everything you need to make robots are in QRobot.zip. It was made with keep subfolders. When you unzip QRobot
you need to keep these folders. Robot will be the main directory. You can put this folder any where you want and change the library in the ini file you use to render a robot. I've included an ini file so you can make a copy of it and change it to you needs.
You'll notice that all the directories in my ini file are G. That's because I have a dedicated hard drive for POV.
Quick Start
One you've unzip QRobot.zip and are in POV you'll need to copy the ini file from the Robot directory and change any library locations. Then load 'ABot.pov' from the Quantum folder and render. You should have your first robot. If not recheck the library files and directories.
If you are using a different version of POV other than 3.6 ABot.pov might not work as it uses the spline function.
Try BBot.pov it don't use that function.
Robot
ABot.pov is an good example of how a robot is made. When you open it up the first thing you'll notice is that there's an #ifndef(Get) statement. This will allow you to include Abot.pov from another pov file by defining Get or preview a robot if you just run Abot. I set all the robot parts up this way. Especially because the head and hands are call by the body file(like ABot)
When you preview ABot you can change anything inside the if statement to get a better view of the robot and There's section
that's marked Change that allow you to change the textures and the poses. This what you'll see.
// ============Change=================
#include"BotColA.inc"// textures
#declare BodFile="Catch.txt";// main body pose
#declare FacFile="Smile1.txt";// Face (eyes & mouth) pose
#declare RhndFile="Resth.txt"// right hand pose
#declare LhndFile="Resth.txt";/ /left hand pose
#include "BotReadPos.inc"// read variables
#include "BasBotRef.inc"//lengths refferences
#declare Nav=<0,0,0>;//rotate value
All these variable above have to be define or included in the file that includes Abot.pov.
The order is important, all the poses must be defined before BotReadPos.inc is included. BotReadPos.inc reads all the poses. BotReadPos.inc must be before BasBotRef.inc. BasBotRef.inc calculates the contact points location.
The texture file in this case BotColA.inc and Nav can be included or define anywhere before Abot.pov is included.
Nav is the vector that will rotate the robot around the contact point.
The rest of Abot.pov is the making of the robot. The Hands and Head have there own pov file. They are an unchangable part of a robot. If you want different head or hands make another robot. This is the code I use to call them
#ifndef(Get) #declare Get=1; #declare Getp=1; #end
#include "Head.pov" // make Head can Change
#include "XHands.pov" // make Hands can Change
#ifdef(Getp) #undef Get #undef Getp #end
It done this way so that you can preview ABot.pov.
The rest of the code makes the body of the robot and creates an object called Robot that is union of the head, hands, arms, legs and so on .
Head
The head is made in it own pov file. It has all the basics eyes, nose, mouth, ears. It has it own pose file.In the example ABot.pov it's "Smile1.txt". You must define the head pose before you include Hand.pov Like ABot.pov you can preview or call head.pov from another pov file. An object called Head is made with the zero point at where the neck should be.
The pose consist of :
#declare EyeLA=<0,0,0>; // <+-20,+-20,0> Eyes look at angles
#declare Puple=.25;// 0=<Puples=<1
#declare Leyeu=30;// 0 to 60 left upper eyelid
#declare Leyel=-30;// 0 to -60 left lower eyelid
#declare Reyeu=28;// 0 to 60 Right upper eyelid
#declare Reyel=-30;// 0 to -60 Right lower eyelid
#declare Lm1=1;// +-1 left most mouth
#declare Lm2=.25;// +-1 Left mouth
#declare Lm3=.0;// +-1 Middel mouth
#declare Lm4=.25;// +-1 Right mouth
#declare Lm5=1;//+ -1 Right most mouth
Right now the both eyes point in the same direction. The zero vection is looking streight ahead. The puple value is for both eyes
also. There are 4 floats values to adjust the eye lids,2 for each eye,one for the upper and one for the lower lid.
The mouth has 5 float points to adjust. They are up and down parts of the lips. I made the head pose data as flexable as I could so you could make several different heads and use the same pose data. The pose data only affects the face. To rotate the head position change the robot's pose.
Hands
A hand is made in it's own pov file. It has all the fingers and thumb. It has it own pose files. One pose can be used for either hand. In the example ABot.pov it's "Resth.txt". Hand.pov also use "HandBone.inc" that has the length of each finger bone. Like ABot.pov you can still preview by running hand.pov.But unlike ABot.pov you have to call another pov file to make both hands for the robot. In the ABot.pov example it's "Xhands.pov" and this makes the two hands called Lhand and Rhand. The way to use "Xhands.pov" is to declare RhndFile and LhndFile with hand pose txt strings and include "BotReadPos.inc" before you include "Xhands.pov".
A hand has as many joints as the robot body. You can make a pose by hand but it is hard work. That's why I created PosenHLR.exe It can make pose for a hand fairly easy.
The pose data only affects the fingers . To position a hand change the robot's pose. The contact point for a hand is in the palm
Poses
This is a review of all the poses and their directories use to make a bot. Each pose is a text file.
The directory Faces holds head.pov and any head you make as well as the head poses.
The directory Hands holds Hands.pov, Xhands.pov, ReadHandPos.inc as well as hand poses.
The directory Poses holds only robot body poses.
Animation
A keyframe animation is what this is. (it uses POV's frame_number), with 3 minor animations running at once. You have the Head, the Hands, and finally the body. Right now it's a linear transition from one pose to another. But none of these 3 minor animations have to end on the same key frame. Each of these actions has its own action file that's a list of poses and the number of frames. Action files are text files and need to be edited by hand.
Before we get carried away with the action files. Let' take a look at what file will use them. The example I'll use first is AniBot.pov. It will show one animated robot on a plane. As when we made the robot with Abot.pov, AniBot.pov is set up to be included in another pov file or ran to preview the action.
Now back to the action files, They have to be defined before including FrameCnt6.inc. FrameCnt6.inc reads and calculates all the 3 poses for a frame. BasBotRef.inc is specifically used in Abot.pov to define body parts and must be included here.
This is how they are used in AniBot.
#declare ActionBod="Walk4.txt"// change file for body animation
#declare ActionFac="Mstart.txt"// change file for face animation
#declare ActionRhnd="Heye.txt"// change file for RHand animation
#declare ActionLhnd="Heye.txt"// change file for LHand animation
I have a 3 directory for animation
ActionB directory is for the robot's animated Body
ActionF directory is for the robot's animated Face
ActionH directory is for the robot's animated Hands.
A little about how to make a action file. In all 3 types there's a number then a string. The string is a file name of a pose, the number is the number of frames that pose is from the pose before it. All action files first number are zero. The action file for the body has a vector the others don't. that vector is for rotating the robot around the contact point.(Nav in ABot.pov)
The next thing we have to is add a texture file. AinBot.pov uses BotColB.inc
The last file we need is Abot.pov, that'll make the robot.
Files
Here is a list of directories and example files
ActionB -
- Walk.txt robot's animated Body
ActionF -
- WalkSmile.txt animated Face
ActionH-
- WalkHans.txt animated Hands.
Faces-
-Head.pov make head - Norm.txt head pose
- Smile.txt head pose -Frown.tex head pose
Hands -
- Hands.pov, make hand -Xhands.pov make both hands,
-ReadHandPos.inc read a hand pose -NotmH.txt hand pose
-Fist.txt hand pose -Rest.txt head pose
Poses -
- Wcontact.txt body pose - WcontactM.txt body pose - WhiPnt.txt body pose
- WhiPntM.txt body pose - Wpass.txt body pose - WpassM.txt body pose
- Wrecoil.txt body pose - WrecoilM.txt body pose
Textures-
-BotColA.inc textures -BotColB.inc textures -BotColC.inc textures
Quantum-
-Abot.pov make a robot -BasBotRef.inc robot part lengths - BotReadPos.inc read robot pose
Zanimate-
-AniBot.pov an animated robot -AniBotB.pov an animated robot
-AniBotC.pov an animated robot -AniBotD.pov an animated robot
- FrameCnt6.inc reads and calcs the frame pose
-MasterA1.pov animate 4 different robots -MasterB1.pov animate16 copies of a robot
Pose programs
As of now I have three Window programs written in C++ that help pose parts of a robot.
There is PosenLR and PosenH and PosenF.
PosenLR.zip poses the body of the robot
PosenH.zip poses the hands.
PosenF.zip poses the face.
Do to my free web site server's bandwidth limits I have the programs seperatly on my web site.
Contact Me
My e-mail address
Leroy Whetstone whetstoneleroy@gmail.com
If you e-mail me be sure to put POV in the subject or I might not read it.